Mitigation Block
The Simple Version
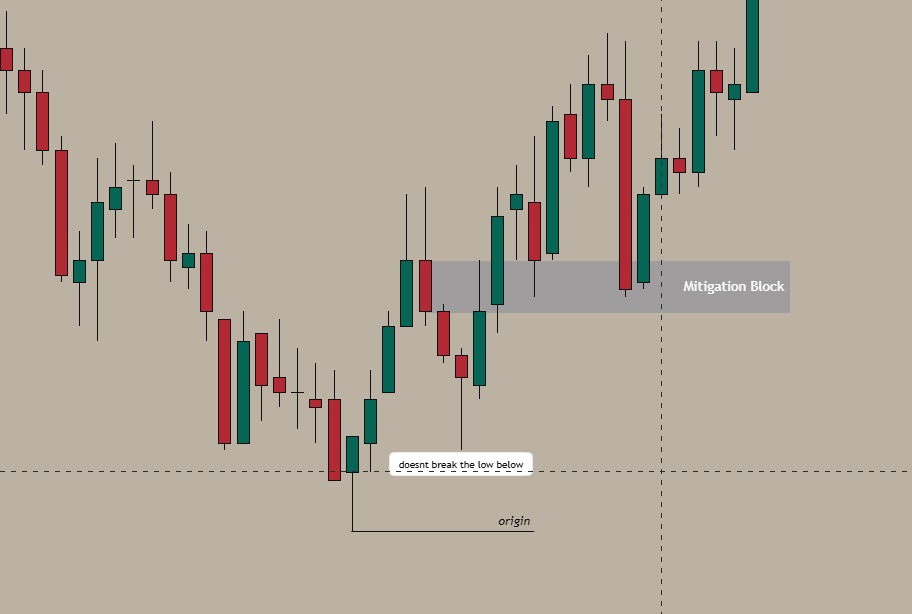
A Mitigation Block is where a move started, before that move’s high or low gets taken out. After the level gets swept, price often returns to where the move began.
Think of it as price going back to “break even” after a failed attempt.
What It Looks Like
- Price makes a move from point A, creating a swing high or low
- Later, that high or low gets taken out (swept)
- Price returns to point A
Point A is your Mitigation Block.
Bullish Mitigation: Origin of a down move. After the low gets swept, price returns to where the down move started. Bearish Mitigation: Origin of an up move. After the high gets swept, price returns to where the up move started.
 Bullish Mitigation Block
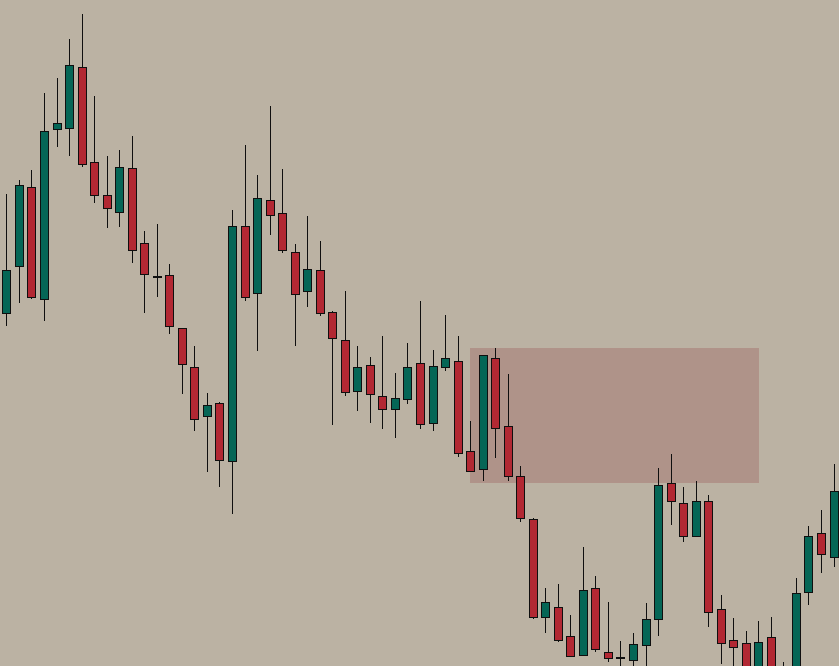 Bearish Mitigation Block
The Breakeven Logic
Traders who entered at the origin are now underwater after the sweep. When price returns, they exit at breakeven. This creates a reaction at that level.
It’s like giving trapped traders a chance to get out without losing money.
How to Find It
- Find a swing high or low that just got taken out (swept)
- Trace back to where that move started (the origin)
- Mark the last opposing candle at the origin
- Wait for price to return after the sweep
How to Trade It
Entry: After the sweep happens, wait for price to return to the origin. Enter at the zone.
Stop: Beyond the Mitigation Block.
Target: In the direction of the new move after the sweep.
Confirmation: If price returns to the origin but fails to break through, this creates a failure swing - a strong sign the mitigation is holding and your direction is valid.
When It Fails
A Mitigation Block is invalid if:
- The high/low hasn’t been swept yet (no sweep = no mitigation)
- Price closes completely through the origin
- The origin is too old (days or weeks)
Watch for the failure swing - if price tests the Mitigation Block and creates a failure swing (fails to break the origin), that’s confirmation. If price blasts through without hesitation, the mitigation failed.
Quality Check
High-quality Mitigation Block:
- Swept level was significant (session high/low, previous day high/low)
- Clear origin candle
- Fresh (current session or day)
- Strong move from the origin originally
- Failure swing forms on retest
Low-quality Mitigation Block:
- Swept level was minor
- Unclear where the origin is
- Origin is old and stale
- Weak original move
Common Mistakes
Confusing with Order Block. They’re different. Order Blocks need displacement after. Mitigation Blocks need a sweep of the level first.
Trading before the sweep. No sweep = no mitigation. The level must be taken out first.
Ignoring failure swings. When price tests the origin and fails to break through (failure swing), that’s your confirmation. Don’t ignore this signal.
Using old origins. Stale origins lose power. Focus on fresh setups.
Mitigation in the Asian Model
Mitigation Blocks on their own are just patterns. They have no statistical edge in isolation. What gives them power is context - when they align with a trading model.
Example: Asian session creates highs and lows. London or New York sweeps those levels. The origin of the Asian extreme (where the high or low was created) becomes a Mitigation Block. After the sweep, price returns to that origin for mitigation before continuing. The sweep + return to origin + failure swing combination is what creates the edge.
Quick Checklist
- High or low has been swept
- Origin candle identified
- Origin is fresh (current session or day)
- Waiting for return after the sweep
- Watch for failure swing as confirmation
- Aligns with new directional bias